
Emergency Wedding Garment Fixes Every Bridal Entourage Should Be Ready For
Garment emergencies at Filipino weddings follow a pattern. The bustle hook breaks during the first dance. The hem catches on a pew during the recessional. A bead pops off when a ninang hugs the bride too tight. Lechon grease lands on the skirt during the reception. Each of these problems has a fix that takes under ten minutes, if the right person in the entourage knows what to do and has the right tools within reach.
This guide covers the most common garment emergencies at Filipino weddings, the fix for each one, and how to assign repair roles across your bridal party so the bride never has to touch a safety pin on her own wedding day.
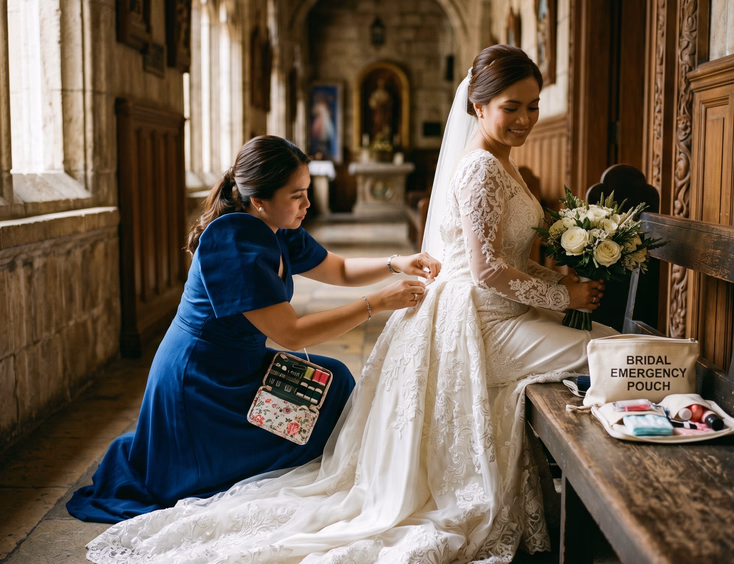
Assign a garment point person before the wedding
The bride should not fix her own gown. She should not diagnose the problem, dig through a bag for supplies, or stitch anything while wearing the dress. That job belongs to one designated member of the entourage.
Pick someone who:
- Stays calm under pressure
- Has basic sewing skills (can thread a needle, sew a straight stitch, attach a button)
- Will be near the bride throughout the day
- Knows how the gown's closures, bustle, and embellishments work
The maid of honor is the most common choice. A bridesmaid with sewing experience or the wedding coordinator also works. The garment point person carries the emergency kit, stays within arm's reach of the bride during transitions, and handles all garment fixes for the entire bridal party.
Brief this person at least one week before the wedding. Walk through the gown's closures, show them the bustle mechanism, and let them practice fastening and unfastening the hooks, buttons, or ties. Record a video of the bustle process on your phone so they can review it the night before.
Fix a broken bustle in under five minutes
Bustles break more often than any other gown component. They bear the weight of the train across hours of walking, sitting, and dancing. A guest steps on the hem during a packed dance floor, and the hook or loop gives way.
The fix depends on the bustle type:
Hook-and-loop bustle. If the loop tears off the fabric, replace it with a large safety pin. Push the pin through the fabric at the original loop's attachment point, then hook it onto the corresponding button or hook. Use two pins if the fabric is heavy. Pin from the inside so the metal stays hidden.
Button-and-loop bustle. If the thread loop breaks, use clear fishing line and a needle to stitch a new loop in the same spot. Fishing line holds more weight than standard thread and blends into white fabric. If you don't have fishing line, use heavy-duty white thread doubled over for extra strength.
Tie bustle. If a ribbon or tie comes loose, retie it. If the ribbon tears, replace it with a safety pin or a strip of fashion tape folded into a loop. Secure the train at the same height as the original tie to keep the bustle even.
Emergency shortcut. If the bustle fails beyond quick repair, gather the train in a loose bunch and pin it to the inside of the skirt at the waistline using three to four large safety pins. The silhouette won't be perfect, but the train stays off the floor and the bride can move.
Your entourage should practice the bustle at least once at the final fitting. The person fastening the bustle on the wedding day should be the same person who practiced it at the atelier.
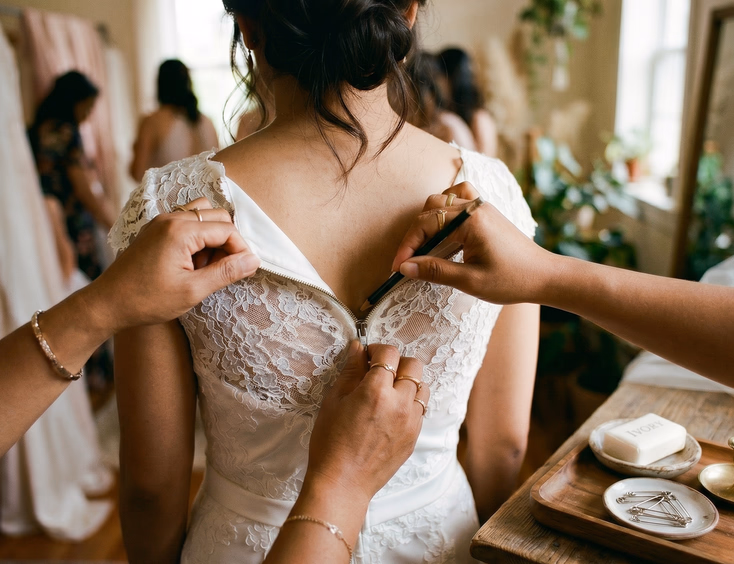
Unstick or replace a broken zipper
A jammed zipper triggers panic faster than any other garment problem. The bride is half-dressed in the bridal suite and the zipper won't move. Or worse, it jams mid-ceremony and the bodice starts gapping.
If the zipper jams:
- Stop pulling. Forcing a stuck zipper tears fabric and bends the teeth.
- Rub a graphite pencil, a bar of soap, or a wax candle along both sides of the zipper teeth near the jam point. These act as dry lubricants that reduce friction.
- Tug the slider in short, gentle movements. Wiggle it a millimeter up, then down, then up again. Most jams clear within thirty seconds once the teeth are lubricated.
If the zipper pull tab breaks off:
Use needle-nose pliers from the emergency kit to grip the slider body and move it. If you don't have pliers, loop a small safety pin or a paperclip through the slider hole and use that as a new pull tab.
If the zipper fails completely:
Safety pins save the gown. Pin the fabric closed from the inside, starting at the top and working down. Space the pins one inch apart for a secure hold. Layer fashion tape over the pins for a smoother surface against the skin. The repair won't be invisible, but under a veil and with the right posture, guests won't see it.
Reattach loose beads and sequins on the spot
Beads pop off at friction points: the waistline, underarms, neckline, and anywhere the cord or veil touches the gown during the ceremony. A single loose bead thread can unravel a whole line of beading if you don't stop it.
If one or two beads fall off:
Thread a needle with white or ivory thread (match the gown's base color). Stitch through the fabric at the bead's original position, slide the bead onto the thread, and loop the thread back through the fabric twice. Knot it on the inside. Trim the excess. This takes two minutes.
If the bead thread is unraveling:
Apply a small dot of clear nail polish to the last secure bead on the strand. The polish seals the thread and prevents further unraveling. Let it dry for sixty seconds before the bride moves. This is a temporary hold. A professional can restitch the full line after the wedding.
If you don't have replacement beads:
Ask your designer for a small bag of spare beads at the final fitting. Pack them in the emergency kit. If the bead is gone and you have no match, secure the thread ends with clear nail polish and leave the spot empty. One missing bead near the hemline is invisible in photos. One missing bead that unravels twenty more is a visible problem.
Repair a torn hem or ripped seam
Hems tear when someone steps on the train, when the fabric catches on a pew corner, or when the bride's heel snags the lining during a turn. Seams rip at the waist, under the arm, or along the side when the gown stretches beyond its fitted range.
Small tear (under two inches):
Pinch the torn edges together. Apply a strip of double-sided fashion tape along the inside of the tear. Press firmly for ten seconds. Fashion tape holds through several hours of movement and is invisible from the outside.
For a stronger fix, stitch the tear closed with a needle and matching thread. Use small, tight stitches close to the edge. Sew from the inside so the stitching stays hidden.
Large tear (over two inches):
Combine both methods. Stitch the tear closed first, then reinforce it with fashion tape on the inside. If the tear is on the hem and the fabric is frayed, fold the raw edge inward and stitch through the fold to prevent further fraying.
Seam rip along the bodice or waist:
Safety pin the seam closed from the inside. Use multiple pins spaced half an inch apart. If the seam rip is under the arm, the bride can keep her arm lowered to hide it during photos and the ceremony. Pin it, and schedule a professional repair after the wedding.
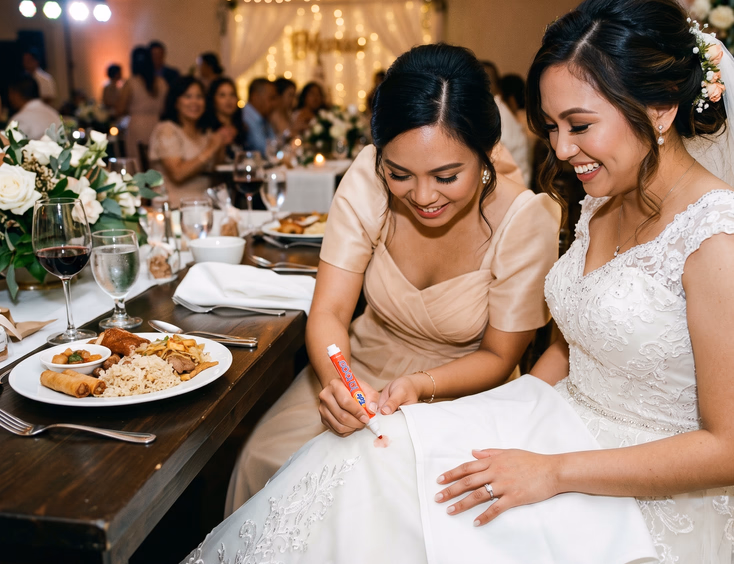
Handle stains during the ceremony and reception
Filipino receptions serve food that stains fast. Lechon grease, red wine, sinigang broth, ube desserts, and chocolate can all reach the gown between the toasts and the first dance.
Oil and grease stains (lechon, adobo, butter):
Sprinkle baby powder or cornstarch over the stain. Let it sit for two to three minutes. The powder absorbs the oil before it bonds with the fiber. Brush it off with a clean white cloth. Don't rub. Rubbing pushes the grease deeper into the fabric.
Red wine and colored liquid stains:
Blot with a clean white cloth dampened with cold water. Press the cloth against the stain and lift. Repeat with a fresh section of the cloth. Apply a stain removal pen to the spot. Avoid hot water, which sets wine stains into fabric.
Ube and colored dessert stains:
Blot with cold water within thirty seconds. Ube leaves a purple pigment that bonds fast to natural fibers like piña and silk. A stain removal pen can lighten the mark, but a deep ube stain on light fabric will need professional treatment after the wedding. Don't scrub piña or silk. The fibers will fray.
Makeup stains (foundation, lipstick):
Scrape off excess product with a clean edge (a credit card or butter knife). Cover the remaining mark with white chalk or baby powder. Let it absorb for two minutes. Brush off. Chalk matches white and ivory fabrics and hides the stain until professional cleaning.
Ink stains:
Dab rubbing alcohol onto a cotton swab. Apply it to the ink spot with light pressure. Test on a hidden area of the gown first, because alcohol can affect some dye finishes. Blot, don't rub.
For all stain types: treat fast, blot instead of rubbing, and accept that some stains need professional attention after the event. A quick treatment on the day prevents the stain from setting permanently.
Secure a slipping strap or gapping neckline
A strapless bodice can slide during dancing. Spaghetti straps stretch after hours of movement. A sweetheart neckline gaps when the bride leans forward for photos.
Fashion tape is the fastest fix. Cut a strip of double-sided fabric tape and press it between the skin and the bodice at the slip point. Fashion tape holds necklines, secures straps to the shoulder, and closes small gaps along the bust line.
For a strap that keeps falling:
Pin the strap to the bodice lining from the inside using a small safety pin. Position the pin where it won't press against the skin or show through the fabric. If the strap has stretched, fold the excess fabric at the shoulder and pin the fold to shorten the effective length.
For a bodice that rides down:
Apply fashion tape in two vertical strips, one on each side of the bust, between the skin and the fabric. If the bodice has boning, the boning may have shifted. Press it back into position through the fabric and secure it with a pin from the inside.
Manage the cord and veil ceremony without snagging the gown
Filipino Catholic ceremonies include a moment where sponsors drape a veil over the couple and place a cord (yugal) in a figure-eight over their shoulders. Both the veil and cord cross directly over the bride's neckline, shoulders, and upper back, where beading, embroidery, and lace are most concentrated.
Before the ceremony:
- Brief your veil and cord sponsors on where beading and embellishments sit on the gown. Show them during the rehearsal.
- Ask sponsors to place the veil and cord on smooth fabric sections, avoiding clusters of beads or raised embroidery.
- If the neckline has protruding sequins or crystals, apply a thin strip of fashion tape over the sharpest points so the cord slides across without catching.
During the ceremony:
If the cord catches on a bead or embroidered edge, the sponsor should stop and lift the cord straight up, not pull it sideways. Pulling sideways rips beads off the thread. Lifting up clears the snag without tearing anything.
When sponsors remove the cord and veil:
They should lift both items slowly and check for any caught threads or beads before pulling away. A five-second pause at the end saves a repair during the reception.

Fix a broken shoe or heel mid-event
A snapped heel or a broken strap sidelines the bride faster than any gown problem. You can't walk the reception in a broken shoe, and going barefoot on a reception floor invites injury.
If the heel snaps or wobbles:
Apply strong adhesive (super glue or fabric glue from the emergency kit) to reattach it. Hold the heel in place for sixty seconds. Let it dry for five minutes before putting weight on it. If the heel can't be salvaged, switch to the backup pair of flats packed in the bridal suite. The maid of honor should know where the backup pair is stored.
If a strap breaks:
Tie the broken ends together if possible. If the strap is too short, use a safety pin to reconnect it to the shoe. Fashion tape can hold a strap to the ankle or foot for short walks, but it won't survive a dance floor.
Plan ahead: Pack a pair of comfortable flats in the bridal suite or bridal car. Many Filipino brides switch to flats after the ceremony anyway. Having them ready turns a shoe emergency into a planned transition.
Build your entourage's emergency response plan
Garment emergencies happen at specific moments during a Filipino wedding. Map the highest-risk windows and assign coverage for each one.
| Window | Risk | Point Person |
|---|---|---|
| Bridal suite dressing | Zipper jam, strap issue, makeup on fabric | Maid of honor |
| Church ceremony (kneeling, cord and veil) | Bustle hook stress, bead snag from cord, hem contact with floor | Garment point person seated in the front pew |
| Photo session (garden, beach, stairs) | Hem tears on terrain, train dragging through grass or sand | Train handler (assigned bridesmaid) |
| Reception entrance and first dance | Bustle failure, strap slippage from movement | Garment point person near the dance floor |
| Dinner service | Food and drink stains | Stain guard bridesmaid seated next to the bride |
| Open dancing and send-off | Hem tears from guests stepping on fabric, bead loss from hugging | Garment point person on the floor |
Print this table and hand it to your entourage the day before the wedding. Each person knows their window, their risk, and their fix.
Stock the emergency kit with the right tools
Your garment point person needs a kit packed for these exact fixes. The basics:
- Safety pins (small, medium, large)
- Mini sewing kit (needles, white thread, ivory thread, clear fishing line)
- Fashion tape (double-sided, fabric-safe)
- Stain removal pen
- Baby powder or cornstarch in a small container
- White chalk
- Small scissors
- Clear nail polish
- Lint roller
- Blotting sheets
- Rubbing alcohol and cotton swabs
- Spare beads from the gown designer
- Crochet hook (for loop-and-button closures and bustles)
For the full packing list with additions specific to the Philippine climate and rainy season, read what to pack in a bridal emergency kit to protect your wedding garments on the big day.
Practice before the wedding, not during it
Every fix in this guide works better when the person doing it has tried it once before. Set aside thirty minutes at the final fitting or at the pre-wedding rehearsal to run through these drills:
- Bustle on, bustle off. The maid of honor fastens and unfastens the bustle twice without help. Record a video.
- Zipper rescue. Practice lubricating a zipper with a pencil and moving the slider in short tugs.
- Safety pin closure. Pin a section of fabric closed from the inside using three pins spaced one inch apart. Check that the pins don't show from the outside.
- Stain blot. Dab baby powder on a fabric swatch and brush it off. Practice the blot-don't-rub technique with a damp cloth.
- Fashion tape placement. Apply tape to the neckline and test that it holds when the bride leans forward.
Fifteen minutes of practice prevents fifteen minutes of panic at the church.
Protect your gown beyond the emergency fixes
Quick fixes keep the gown wearable through the wedding day. Long-term garment care keeps it preserved for years. For a full timeline of gown care from fitting day through preservation, read our complete guide to wedding garment care in the Philippines.
If you want to prevent garment problems before they start, catch them at the fitting stage. Our guide on what to check during your bridal gown fitting to avoid last-minute garment emergencies walks you through the stress tests and inspections that flag problems weeks before the wedding.
Need a professional to handle pre-wedding reinforcement, same-day steaming, or post-wedding repairs? Browse our garment care suppliers directory to find vetted providers across the Philippines.
Still Searching for a Right Match?
Find Your Perfect Wedding Supplier Today!
Discover trusted wedding suppliers across the Philippines in our complete directory. Compare services and connect with the ones that fit your dream celebration.
Browse Wedding SuppliersFeatured Blog Posts


Filipino Wedding Entourage - Roles, Order of March, and Modern Etiquette
6 mins readCivil Weddings in the Philippines - Requirements, Costs, and Step-by-Step Process
9 mins readCivil Wedding Requirements in the Philippines - Complete Checklist
6 mins readCost of Wedding in the Philippines - 5 Essential Things You Need to Know
7 mins readPrincipal Sponsors (Ninong/Ninang) - How Many, How to Ask, What They Really Do
4 mins readVeil, Cord, Candle & Coins - Roles, Options, and When They Happen
4 mins readEntourage for a Traditional Pinoy Wedding - Complete Roles and Guide
6 mins readComplete List of Civil Wedding Requirements in the Philippines
8 mins readHow to Choose Wedding Ninongs and Ninangs - Ask Yourself These 3 Important Questions
5 mins read